Monday, October 25, 2010

Candle Jewelry

Have you ever noticed how a pair of earrings can change your entire look?  I know I feel kinda naked without earrings.  I thought maybe a candle might look a little more dressed up with a stud in it.  It’s actually a decorative paper brad I bought in the scrapbook area at a craft store. 

IMG_5433

I pushed the brad into a candle for a simple and easy change. 

IMG_5426

IMG_5431

What do you think? 

Can you imagine what a beautiful flashy brooch or large earring might do to a simple candle?  If you try any candle jewelry I would love to see a photo.  Maybe I can do a post all of your ideas.  

Thanks for stopping by.

Tracy


Linking to

Anything Related @ All Thingz Related

Show and Tell @ My Romatic Home

Sunday, October 24, 2010

Pottery Barn Inspired Candles

I finally got a pottery barn catalog in the mail this weekend.  I will request a catalog and get a few and then they seem to stop coming.  I wonder if it is because I don’t order anything?  The catalogs are great for inspiration. I saw these 2 ideas and thought I would give them a whirl in my own way.

Here are my 2 inspiration photos.

image

image

I almost threw out these little candle holders the other day and after second thought I stashed them away.  I am so glad I did because they fit perfectly inside the top of jars.

IMG_5368

IMG_5370

I got out a few items I already had  that looked similar to what was in the pottery barn candle holder.

IMG_5367

I layered them inside the jar.

IMG_5374

I placed the candle and candle holder on top.

IMG_5377

Next I tied some silk leaves to a bigger jar with twine.  I have seen some other bloggers do something similar and I wanted to share their candles, but I couldn’t find who it was.  If you let me know I will add your name to my post.

IMG_5378

And now I have two easy to change for the seasons candle holders.  

I placed them in different areas of light to show you what they look like.

Day time.

IMG_5379

Dark room.

IMG_5397

IMG_5396

Dim room.

IMG_5407

IMG_5412

IMG_5419

I will be doing some fun things soon to get ready for a Christmas Tea Table Decorating Contest.  You will love the photos I post from the Tea.  The tables are so awesome and it is such a fun experience.  I hope you all had a great weekend. 


Tracy


Linking to

Metamorphosis Monday @ Between Naps on the Porch

Anything Related @ All Thingz Related

Another Side Table Redo

Years ago I bought a little round table at a garage sale for I think $5.  The poly was worn off of the table and it always had a dullness about it.  This summer I covered it with a burlap table cloth to change it up and today I painted it.  I stupidly deleted my before photo, but I found this one.

I painted it in Martha Stewart’s Dill but using a Behr sample in flat paint.  I glazed it with Miniwax Water Based Wood Sheen stain in Walnut.

IMG_5349

I have some plans for the top, but I have to wait until I get something in the mail to put in the coolest old beat up tray I bought this weekend.  :)

Tracy


Linking to

Piece Of Work Wednesday @ Primitive and Proper

Power Of Paint @ Domestically Speaking

Friday, October 22, 2010

Side Table Redo and Some Wall Plaques

Recently I added an old window screen on my wall to warm up a corner in my family room.  You can read about it here.  I decided I needed to make a few more changes. 

I have been debating about painting a side table and today I took the plunge. 

I got out the Martha Stewart Oolong Tea sample and painted the base and then I stenciled the top with a harlequin diamond print.

IMG_5019

IMG_5020

When it was dry I sanded it and glazed it in dark brown. 

IMG_5025

I added it to my corner along with some white metal plaques I painted and glazed in the same colors.

IMG_5043

IMG_5035

IMG_5041

IMG_5034

IMG_5039

Before

IMG_4944

After

IMG_5034

The lighting is different because the before photo was taken at night. 

I hope one of the  next changes I show you in this room in the near future will be painted trim.  That before and after should knock your socks off. 

Tracy

Linking to

Furniture Feature Friday @ Miss Mustard Seed’s Creative Blog

Weekend Wrap Up @ Tatertots and Jello

Saturday Night Special @ Funky Junk Interiors

Sunday Showcase @ Under the Table and Dreaming

Metamorphosis Monday @ Between Naps on the Porch

Piece Of Work Wednesday @ Primitive and Proper

Power Of Paint @ Domestically Speaking

Origami Paper Star Ornament, Tag or Decor

Last year I was given a Christmas Ornagami Book.  Get it? Ornaments made with Origami. 

IMG_5002

One of my favorite ideas in the book  is a 5 pointed star.  I decided to give it a whirl and I am glad I did.  Love it. 

IMG_4983


IMG_4985

IMG_4990

My supply list included:

12x12 sheet of cardstock scrapbook paper cut into 4 6x6 pieces of paper

IMG_5000

Distress Ink (optional)

IMG_5001

Decorative paper brad (optional)

Hole punch

Twine

IMG_4994

I followed the easy instructions in the book. 
(Instructions from Ornagami: An Origami Christmas at Your Fingertips by Gay Merrill Gross, copyright Quirk Packaging 2005, 2007.)   I have permission to share them with you so you can make one too. 

IMG_5014

IMG_5013

IMG_5012

IMG_5006

IMG_5010

IMG_5009

The instructions go back to #1 here because the first set were for a pentagon base.  The 2nd set if for the star.

IMG_5015

IMG_5016

This photo shows the paper brad from the back.

IMG_4987

I rubbed the finished star onto the ink pad to get the distressed look.

IMG_4993

This is a very inexpensive and easy way to make handmade ornaments, gift tags or home decor.  I think glitter would be a great addition to try.  I also think this would be super cute hung at different levels on a wall mirror.

Will you be making one?  What will you do with your star?

Tracy


Linking to

Favorite Things Friday @ A Few of My Favorite Things

Weekend Wrap Up @ Tatertots and Jello

Saturday Night Special@ Funky Junk Interiors

Sunday Showcase @ Under the Table and Dreaming

Craft-O-Maniac Monday @ Craft-O-Maniac

Get Your Craft On @ Today’s Creative Blog

Whatever Goes Wednesday @ Someday Crafts


Wednesday, October 20, 2010

Vintage Window Screen Wall Art

Yesterday I posted about my painted magnet letters (here), but I didn’t tell you why I made them because I was feeling lazy and tired.  I wasn’t sure when I would get my junky old window screen I bought for $5 sanded and painted so I didn’t want to mention it.

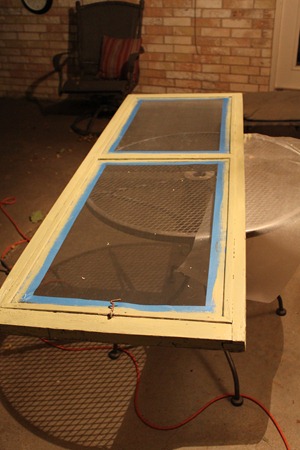
Luckily, the mood struck me about 7pm tonight to get it done.  It is dark here by 7:30pm now.  So with only the porch light,  I sanded and painted and got it done.

I like old chippy paint, but not paint that literally falls off  when someone walks past it.   This window screen was that bad.  I scraped and sanded the loose paint and put a quick coat of light green paint on it.  It is a sample from Home Depot in Martha Stewart’s Oolong Tea. 

This was my night time work area. 
IMG_4932

My husband thinks I am a weirdo for working outside at night.  These shorter days make it hard on a working girl to get things done in the daylight. 

After the paint dried I dry brushed on some acrylic in raw umber to give it an aged look. 

I still need to work on my display, but here is the screen for now.

 IMG_4939

I want to make some cute magnets to hold the photos and I need to put more thought into the photos I use. 

I have never liked this corner, but I like it better with the window screen.  I need to change up some other things and I have some ideas that I will post when I get them done. 

 IMG_4944

This is what the screen looked like before I painted it.

IMG_4893

I like the green Oolong Tea much better not to mention the clean look verses the layers of dirt look.

Have you noticed a little extra something painted on the screen?

I used my bird stencil from my bench project (here) on the screen.  It is a subtle touch. 

IMG_4945

But a good one in my opinion. 

My husband thinks I am crazy for putting an old yucky window screen in our house.  I like it.  What do you think? 

By the way, I have a watch giveaway going on here.

Tracy


Linking to

Strut Your Stuff @ Somewhat Simple

Show Off Your Stuff @ Fireflies and Jellybeans

Under $100 Linky Party @ Beyond The Picket Fence

Transformation Thursday @ The Shabby Chic Cottage

Show and Tell @ My Romantic Home

Remodelaholic’s Anonymous @ Remodelaholic

Weekend Wrap Up @ Tatertots and Jello

LinkWithin

Related Posts with Thumbnails